Business News Daily provides resources, advice and product reviews to drive business growth. Our mission is to equip business owners with the knowledge and confidence to make informed decisions. As part of that, we recommend products and services for their success.
We collaborate with business-to-business vendors, connecting them with potential buyers. In some cases, we earn commissions when sales are made through our referrals. These financial relationships support our content but do not dictate our recommendations. Our editorial team independently evaluates products based on thousands of hours of research. We are committed to providing trustworthy advice for businesses. Learn more about our full process and see who our partners are here.
Entering Bills Into QuickBooks: A Complete Guide
QuickBooks has powerful features to help business owners manage bills, payables and more. Here's what you need to know to get started.

Table of Contents
Most modern businesses must deal with payables from multiple vendors — each with different payment terms, due dates and other relevant details. It’s challenging to manage this level of financial complexity with scribbles on a piece of paper or calendar. Plus, there are limits to how much even Excel accounting can help.
QuickBooks makes life easier for every facet of running a small business by providing a host of powerful features to help track and manage finances. It helps your business function smoothly while providing insights into accounts payable management, cash flow projections and vendor relationships.
Editor’s note: Looking for the right accounting software for your business? Fill out the below questionnaire to have our vendor partners contact you about your needs.
We’ll explain the basics of entering and managing bills in QuickBooks Online and the QuickBooks Pro desktop version.
How to enter bills into QuickBooks Online
After accessing QuickBooks Online and creating an account, entering bills into the tool’s easy-to-use, feature-rich interface is straightforward.
Before entering your bills, you must set up your business’s vendors, products, services and items. After this initial setup, many fields you encounter when entering new bills should auto-populate to match relevant products, services, vendors and even specific product lines.
The following steps will guide you through entering new bills into your QuickBooks Online account. This process is the same regardless of your accounting methods.
1. Create a new bill.
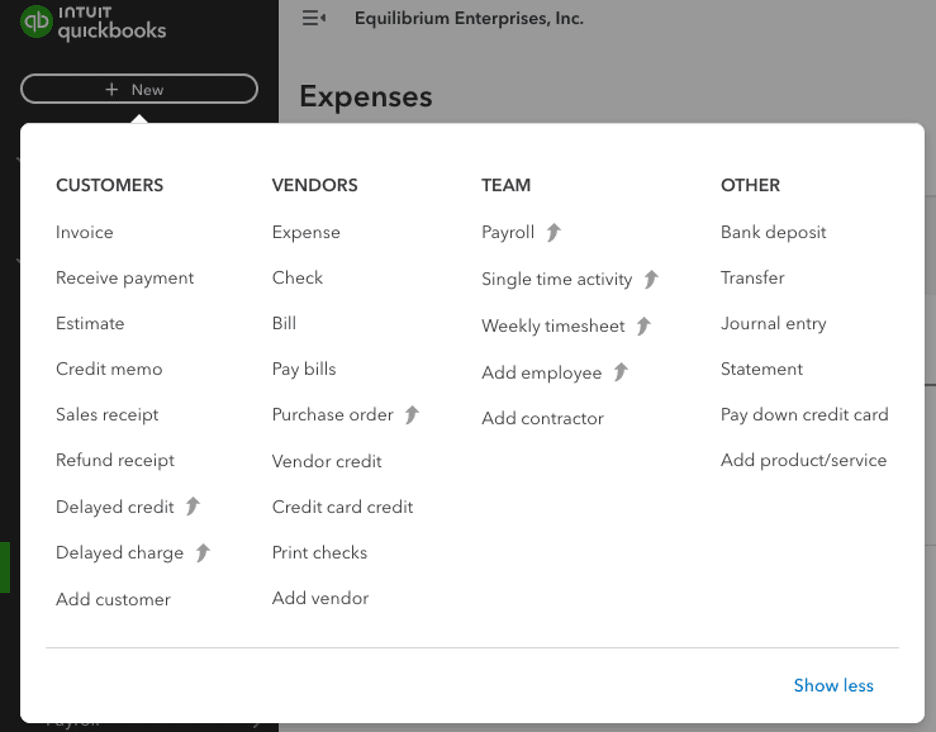
Sign in to QuickBooks Online and go to + New > Bill. You can also select Expenses > Bill > Add Bill > Create Bill. You’ll arrive at a new bill interface.

2. Enter bill details.
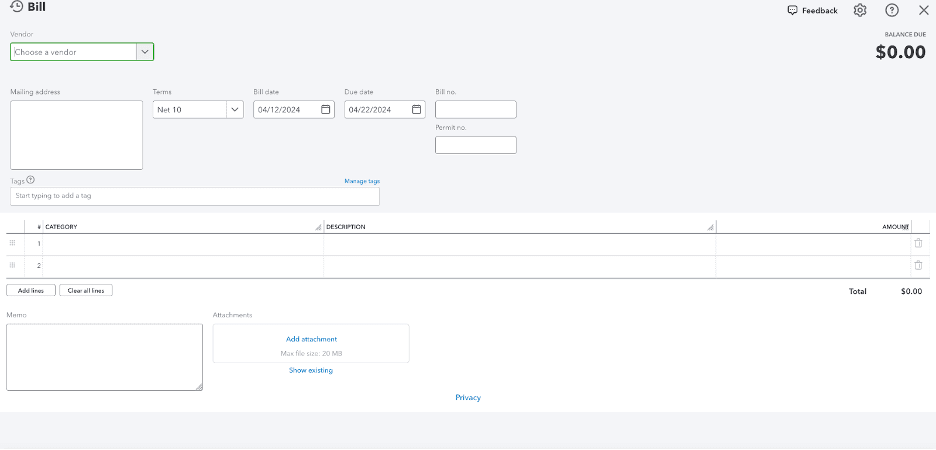
Unless you’ve customized the interface via the platform’s advanced settings, the new bill page will contain all relevant fields to input standard information. Depending on your QuickBooks Online version, the page and fields should be similar to this image:

Fill in the bill’s details, which may include the following, depending on your QuickBooks Online version:
- Vendor: Choose a vendor or set up a new vendor. Once selected, all the vendor’s details will populate automatically, including its mailing address.
- Terms: Select the vendor’s terms from the dropdown menu.
- Bill date: Input the invoice date from the bill. Be sure to enter the actual invoice date and not the date you received the bill.
- Due date: The due date is calculated automatically based on the bill’s date and the payment terms. Still, it’s a good idea to verify the due date by comparing it to the due date listed on the actual bill.
- Bill number: Enter the invoice number on the bill the vendor sent. This will be useful if you must contact the vendor about the bill.
- Category: Choose a category from the dropdown list. You can also create a new category if one isn’t available or applicable or if this isn’t an expense directly billed to customers.
- Description: Type in a description of the expense. This information will help you easily recognize and understand the nature of the bill when you eventually close accounts.
- Amount and tax: This is the total amount or value of the bill and any tax included.
- Markup percentage: This field is relevant if you want to bill the expenses to a customer. Enter the markup percentage if you want the billable amount to be higher than what your vendor or supplier is billing.
- Billable: If you want to make this expense billable to the customer, check this option. Assigning the expense to the product or service instead of the category is a better way to handle a billable expense.
- Product/service: Any customer purchase should be mapped to an inventory item. Assign service items to services billed to customers. Select a product or service, or choose Add New to set up a new one. Once selected, fields such as rate, description, tax, markup percentage and class populate automatically.
- Quantity: Enter the number of hours billed or products purchased. Once you enter the quantity, the amount is calculated automatically using the price multiplied by the quantity, in addition to any applicable markup percentage.
- Project/customer: Select the project or customer for the bill or create a new project or customer.
- Save: When you’ve entered all the details, select Save to save your bill.
3. Review your bill.
Go to Expenses > Vendors to see a list of suppliers. Find the vendor and check the open balance to see its outstanding amount. Select the vendor’s name to see the details of all outstanding bills. You should be able to see the bill you just entered. Alternatively, go to Expenses > Bills > Unpaid to review your recent bill entry.

How to enter bills into QuickBooks Pro
Entering a bill in the QuickBooks Desktop Pro application is similar to the QuickBooks Online functionality. Here’s how it works:
1. Select a vendor.
Navigate to the Vendors menu and use the dropdown menu to select the vendor that sent the bill. If you haven’t added this vendor, select Add New and record the entry.
After selecting the vendor, the date, address and other details should automatically populate. If necessary, add an address manually. After verifying the details, proceed to the next step.
2. Enter payment terms.
If you’ve set up default payment terms for the vendor, your preferences will be listed. Otherwise, choose payment terms and discount rates, if applicable.
These are the options for payment terms:
- 1% 10 Net 30
- 2% 10 Net 30
- Due on receipt
- Net 15
- Net 30
- Net 60
3. Fill in the details.
Verify the due date if it’s filled automatically. Then, fill in additional details to complete the billing record. Here are the fields you’ll see:
- Memo: This field is optional. If you like, add a memo describing the bill.
- Date: Use the dropdown calendar to select the bill’s issue date.
- Reference number: If applicable, add a reference number.
- Amount: Enter the total amount due on the bill.
- Due date: If you haven’t set any vendor preferences, select the due date manually from the calendar.
4. Select the type of bill.
Next, you’ll see two tabs: Expenses and Items. Here’s what they mean.
- Expenses: This is a bill for expenses the business incurs, including utilities, rent and phone service.
- Items: This is a bill for anything the company sells, buys or resells. This includes products, discounts and shipping charges. Select Items to enter bills for specific products.
Choose the type of bill you’re recording. If it’s a utility bill, the Expenses tab is automatically selected, and the amount you entered should appear. Next, you’ll see the Account field, where you’ll select the proper entry. Other fields, such as Billable and Customer, can be left blank. They’ll be populated when you charge a customer for this item or expense.
5. Save the bill.
Select Save & Close to save the bill. To create another bill, select Save & New. You can view the bills you entered in the Bill Tracker or select Pay Bills to start making payments.
QuickBooks Pro offers an easy way to remember any outstanding bills. You can even set up your system to pay bills automatically. To do this, select Memorize before closing out of a new bill. You’ll see a Memorize Transaction screen with three options.
- Add to My Reminders list: With this option, QuickBooks adds the bill to the Reminders list. To ensure you see your reminders every time you’re in QuickBooks, go to the Edit menu. From there, select Preferences > Reminders > My Preferences. Then, check the box next to Show Reminders List When Opening a Company File.
- Do Not Remind Me: If you check this option, you won’t be reminded about the transaction.
- Automate Transaction Entry: Select this option only if you’re sure the transaction will remain the same every time. In the Number Remaining field, enter the number of transactions that must be completed.
How to import bills into QuickBooks
If you’re moving to QuickBooks from another bookkeeping program or have new bills to enter, use the import option to save time and effort.
Here are the steps in QuickBooks Online:
1. Prepare the file.
Before importing your bills to QuickBooks, prepare your Excel or CSV file with the following fields:
- Bill number
- Vendor
- Bill date
- Due date
- Account
- Line amount
- Line tax code
During the import process, you must map each column header to the QuickBooks bill fields.
2. Upload the file.
Follow these simple steps to upload the file for import:
- Go to Settings > Import Data.
- Select Bills. You’ll see an example of the data file.
- Once you see all the fields, select Browse and choose the sheet you prepared.
- Select Open > Next.
- Map the headers.
You’ll be asked to review the column headers and map them to the fields in the QuickBooks bill. Select the date format and VAT option. You’ll also map the VAT codes to those in QuickBooks and select Next. Any mapping issues are highlighted, so you can always go back and make changes.
3. Complete the import.
QuickBooks will present you with an import summary. Select Start Import to begin the process. When the import finishes, you’ll see the status and can verify that all bills have been imported. After verifying, select Done > OK to complete the process.
Staying on top of your finances
QuickBooks Online and QuickBooks Pro can help you organize your accounting and gain control of your finances. To learn more about QuickBooks accounting software, read our in-depth QuickBooks Online review. But if QuickBooks doesn’t feel right for your business, consider a QuickBooks alternative that may better suit your budget and goals. The most important thing is to manage your cash flow and stay on top of your financial reporting.
Jane Godiner contributed to this article.


